Google chrome uses Windows proxy settings. This setting helps you to hide the IP address of your computer and also helps the organization to block access to certain sites. When you connect to a VPN proxy may get set automatically. Sometimes, you may want to change the proxy setting manually to access a particular internet site or resource.
What is Proxy?
A proxy, also known as a proxy server, is an intermediate server that sits between a client (such as a computer or a smartphone) and the target server (such as a website or an online service). The primary purpose of a proxy is to process and forward the client’s requests to the target server and send the server’s response back to the client.
Proxies are used for various reasons, including:
- Anonymity: By hiding the client’s IP address, a proxy provides a layer of privacy and makes it harder to trace the client’s online activities.
- Security: Proxies can be used to filter malicious content, preventing access to harmful websites or downloads.
- Load balancing: In large organizations or networks, proxies can distribute incoming requests to multiple servers, ensuring that no single server becomes overwhelmed.
- Content filtering: Proxies can block access to specific websites or categories of websites, often used in schools or workplaces to restrict access to inappropriate content.
- Caching: Proxies can cache frequently accessed content, reducing bandwidth usage and improving load times for clients by serving cached content instead of repeatedly fetching it from the target server.
Change Chrome Proxy Settings in Google Chrome
Open Google Chrome and click on 3 dots(Hamburger menu) present at the top right hand and click on Settings.
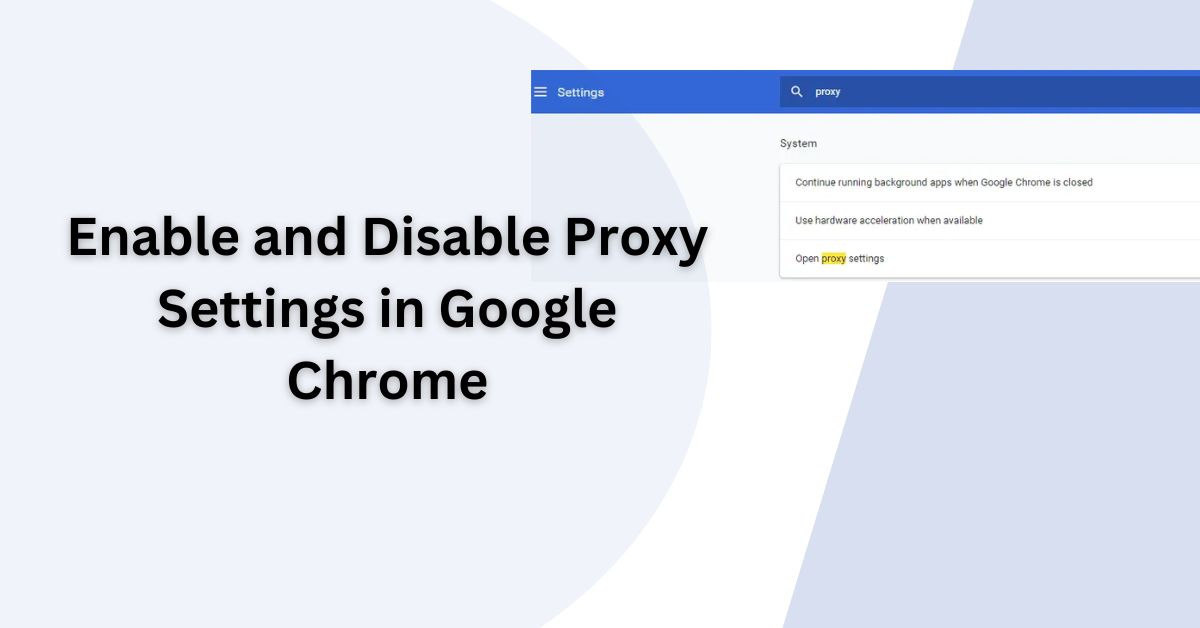
This displays a chrome setup window(shown below) which you can use to control the behavior of chrome. At the top of the window, there is a search box. Just enter proxy in the search box. Chrome display all settings which match the search criteria.
Click Open proxy settings link.
Alternatively, you can scroll down and click on Advanced. You will find the proxy setting under the system menu.

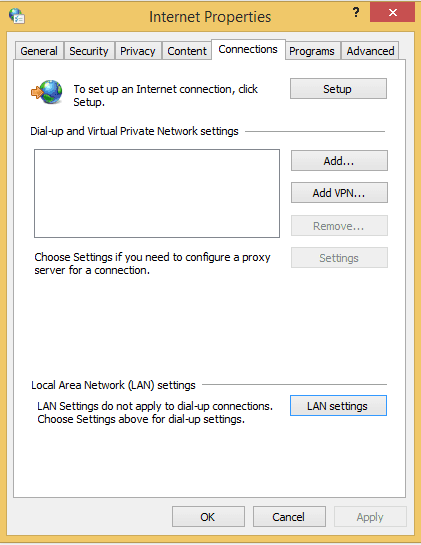
This opens the Internet Properties window as shown below.

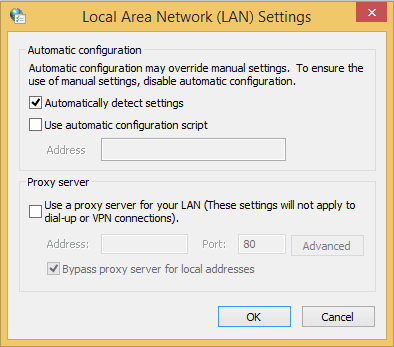
Click the LAN Settings button to open Local Area Network (LAN) Settings.

Here you will find below options.
Automatically Detect Setting – select this if you want to automatically detect settings set up by the network.
Use Automatic Configuration Script – You can use the script given by your network admin for internet access.
Proxy Server –
Select e use a proxy server for your LAN. This should enable the address text box. You can enter Proxy server IP here along with the port default is 80.
You also want to check the Bypass proxy server for local addresses if you access intranet sites.
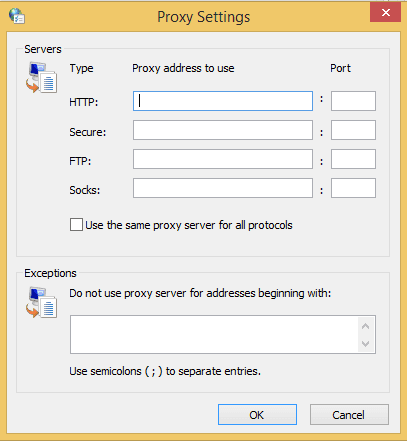
For Advanced setting click Advanced button. This open advance Proxy Settings box as shown below. Here you find two distinct section Server and Exceptions.

Servers
Mention proxy server for HTTP, secure, FTP, and socket along with the port number. If the proxy server is the same select use the same proxy server for all protocols checkbox.
Exceptions
When you set proxy all web resources use it by default. There may be some resources for which you want to bypass. Those you need to mention in the exceptions block as below. Separate each URL by the semicolons.
You can also enter wildcard website names here e.g *.google.com. This will apply the setting for all the subdomains under google.com.
Disable proxy settings in Chrome
Go to proxy settings and then Lan Settings as mentioned above in this document. Click on Advanced and just unselect use proxy server for your Lan to disable proxy in Chrome.
Conclusion
In conclusion, managing your proxy settings in Google Chrome is a straightforward process that allows you to enhance privacy, security, and access restricted content. By knowing how to enable or disable these settings, you can adapt your browsing experience to suit your needs. Should you require further assistance or information, please don’t hesitate to ask.
I hope you found this article useful. Please share and subscribe.
